Google started selling the Clips Smart Camera but now there's a wait list you have to join.


|
Tree lines make excellent photographic subjects, particularly in winter when lacking leaves, and they're not really that difficult to capture on camera either.
The best part of winter is the hot drinks. Raspberry jam tea, lattes with whipped cream, hot cocoa and marshmallows-all this sweet stuff not only tastes fantastic, but is perfect for photos-especially if you add a little levitation spell! Here's how to create a hot cocoa still life with a touch of magic.
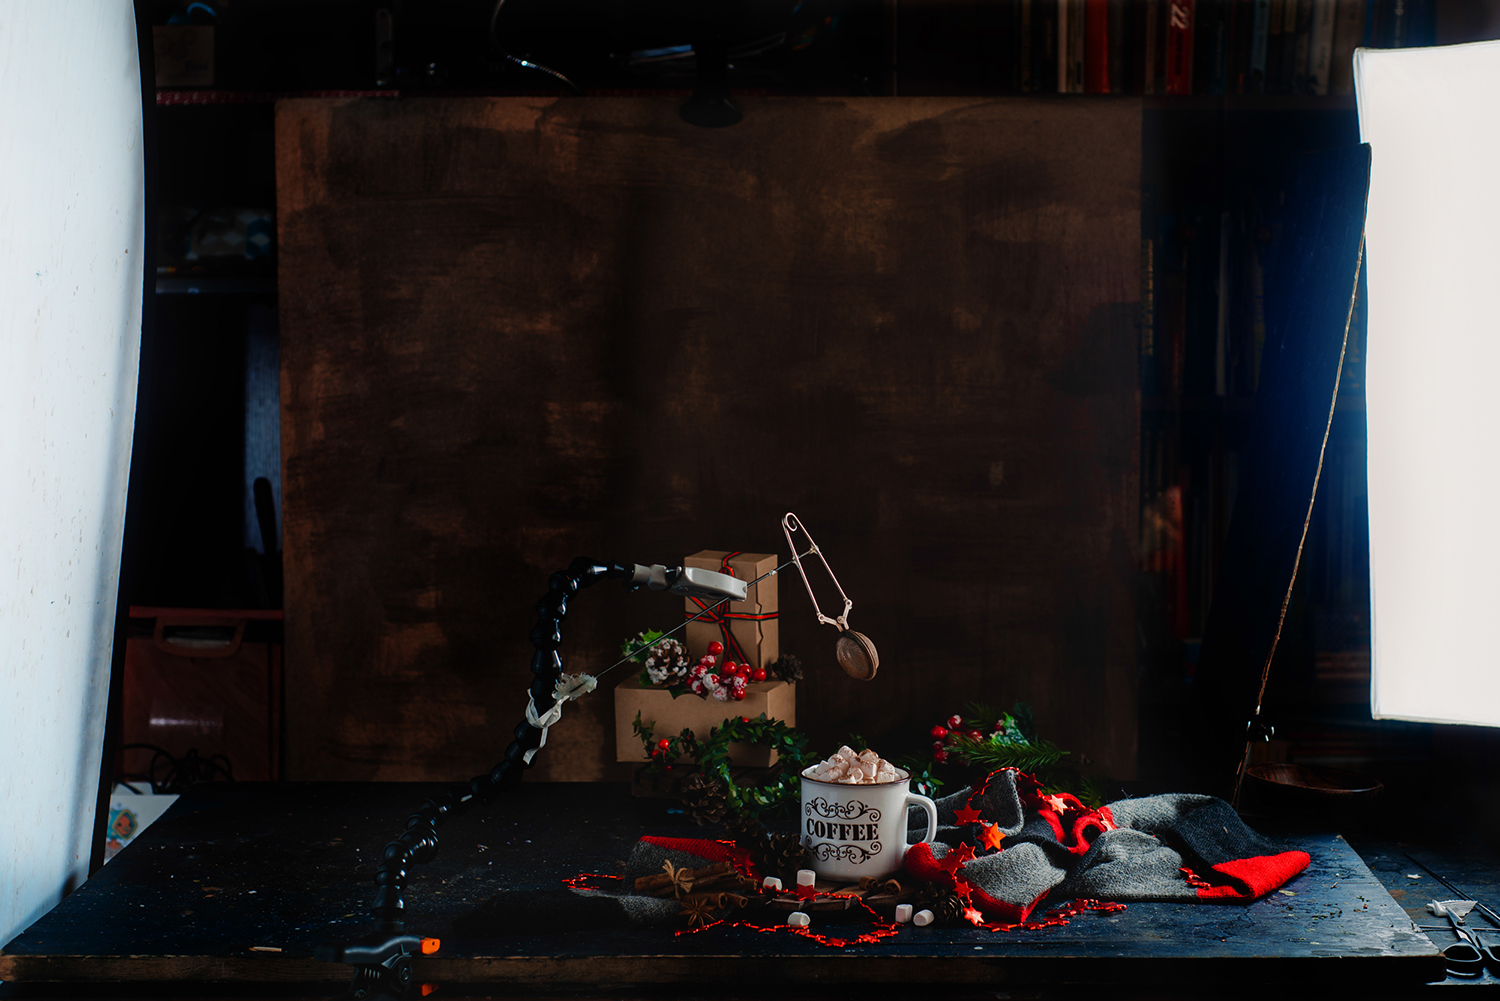
1. Gear and propsFor this still life, you will need:
2. CompositionStart with a cup of hot cocoa and arrange your composition around it. Add a cozy knitted scarf or sweater, a couple of garlands, some cinnamon or anise stars, and lots and lots of marshmallows!
Use a glue gun to attach a strainer with cocoa powder to a small metal rod (I used knitting needle), and suspend it in the air with a special clamp or handy tools (a stack of books and a ruler will work perfectly well).
3. LightingOn the triptych, you can see how the light works in this particular scene. I used two speedlights: one (the key light) is placed in a small stripbox on the right side (a bit behind the scene), the other (the fill light) is set behind a large diffuser on the left side. I also used a black flag between the key light and my background to make the boxes look darker (so they don't attract too much attention).
Also, both speedlights are set on low power, since I want to capture the falling cocoa powder while in the air (it works just like with splashes: low power provides a short impulse, so it's easier to capture movement).
4. ShootingPut your camera in a continuous mode, hit the strainer lightly (so it releases some cocoa powder and falls beautifully on the marshmallows below), and take a series of shots. Hit and repeat!
Don't forget to take an “empty shot”: that is, a shot with the same composition, but without the strainer and any supports, so it will be easier to delete the supports during post-processing.  5. Post-processingChoose the shot with the most beautiful spoonful of cocoa powder. Now, retouch the supports that hold the strainer in the air: place your “empty shot” on the layer above and make the supports invisible, using a layer mask and a small, relatively-soft brush in Photoshop. Adjust color and contrast, and voilà! Now enjoy your cup of hot cocoa.
When we think of storytelling images, we immediately think of people doing something in a documentary type of photograph. After all, people make the most interesting stories. But landscapes have stories too. As a landscape photographer, you can create a collection of images that tell a story about a place without having people as the main focal point in the image.
The following steps will help you pull the story out of the landscape and convey it to your viewers. 1. What is the story?The first thing you need to do is to spend some time thinking about what exactly is the story. Often we go to a place and start making images based on compositional elements in the scene without thinking about what is important to the story first.
When I go to a new place, I often do a scouting trip first just to have a general look around and get a feel for it. Then I do some research to find an interesting story. If the place is a park, why is it a park? Who made it a park? What is the history? What interesting things happen there now and in the past? Do any animals live there, and if so which ones? Once you have some background, you can pick a story to wrap your photographs around.
2. The first photo shoot – using different focal lengthsYour first photo shoot will help you bring your plan together. Go back to the places that had the most photographic potential from your scouting trip and while there look for elements in the scene that relate to the story you have chosen. I usually start out with a wide-angle image that takes in the whole scene. Often I don't end up using this photo in the final collection, but it helps me in my process of making the collection. When you have your photo that takes in everything, think about what are the most interesting things in the scene. Try to pick at least three things and then get closer to each one of them in turn.
ExampleFor example, when I went to the Salton Sea in California (a stunningly beautiful location that was created as a result of a man-made disaster) one feature that is most interesting is a layer of dead fish. But how do you make a good photograph of dead fish? I started by making an image that took in the whole scene. Then I changed lenses to use a mid-range focal length and then a long focal length from where I was standing. Then I started to get closer and closer to the dead fish looking for elements of design such as lines and shapes along the way.
When I found something interesting, again I tried to use different focal lengths to see how I could convey the feeling of the place in an image. Make sure you photograph the details of the scene as well as the overall feeling. Finally, when you find a really interesting detail, get really close to it using your wide-angle lens so you have an image with an interesting detail in the foreground that also takes the whole scene into the frame. 3. The second shoot – using the best lightThe next step is to pick out your favorite images from your first shoot and think about what kind of light could make them better. Is there a subject with a great shape that would make an interesting silhouette? Is it transparent and might glow with some backlight? Would it create interesting shadows at a certain time of day? Would it look best with warm light during the golden hour? Does it need a dramatic sky?
Whatever it is, plan to revisit the location when you have the best chance of getting the conditions you need to make your ideal shot. You may need to go back a number of times, if possible before you get all the shots you want. 4. Putting it togetherWhether you are putting the images into a collection display on your wall, using them in a blog post, displaying them on your website, selling them to a magazine (along with your story of course), or simply showing your friends. Having an interesting set of images that are storytelling will always create a larger impact than random photos of a place that are not connected.
The post How to Make Storytelling Landscape Photos – 4 Steps by Anne McKinnell appeared first on Digital Photography School. |


 RSS Feed
